Sunday, July 9, 2023

Veeam Backup for Google Cloud - Zero Trust Architecture with Cloud Identity-Aware Proxy

Having security embedded by design into your architecture is more than just a best practice. It is how any one should actually start their work in any kind of project in public, private or hybrid cloud. Veeam Backup for Google Cloud (VBG) is one of the technologies that enables data security and resiliency by backing up and protecting your data running in the cloud. However, VBG is also residing in the same cloud and one of the first things is to make sure it is deployed and accessed in a secure manner. 

The challenge rises from the need to access VBG console for configuration and operation activities. The focus of this post is securing this access. 

In a standard deployment you would have your VBG appliance installed in a VPC, apply firewall rules to restrict access to VBG and then using an SSL encrypted web browser connect to the console. This connectivity can be done over Internet or in some more complex scenarios over VPN or interconnect links.  If you are connecting to VBG over Internet, you would need to expose VBG using a public IP address and restrict access to that IP address from your source IP. This is the use case that we are treating in our article. Another scenario using bastion servers and private connectivity is not treated now, however principals and mechanisms learned here can still apply. 


As you can easily see there are some disadvantages in the having VBG directly accessed from Internet. First, VBG is directly accessed from Internet. Having a firewall rule that limits source IP addresses allowed to connect to the external IP address of VBG increases the security trust, but it does not apply zero trust principles. We don't know who is hiding behind that allowed source IP address. There is no user identification and authorization in place before allowing the user to open a session to VBG console. Anyone connecting from that specific source IP address is automatically trusted.

How can we make sure that whoever or whatever trying to connect to VBG is actually allowed to do it? Please mind that we are talking about the connection to VBG console before any authentication and authorization into VBG is applied. We want to make sure that whoever tries to enter credentials in VBG console is identified and has the permissions to do that action. 

Think of use cases where your user has lost his rights to manage backups, however still has access to the backup infrastructure. You would want to have a secure and simple way of controlling that access and being able to easily revoke it. In this situation we can use Cloud Identity and Access Management (IAP) and Cloud Identity-Aware Proxy (IAP).

How does it work?

Cloud IAP implements TCP forwarding which encrypts any type of TCP traffic between the client initiating the session and IAP using HTTPS. In our case we normally connect to VBG console using HTTPS (web browser). Adding IAP TCP forwarding, the initial HTTPS traffic will be encrypted in another HTTPS connection. From IAP to VBG, the traffic will be sent without the additional layer of encryption. The purpose of using IAP is to keep VBG connected to private networks only and control which users can actually connect by using permissions and IAM users. 

Public IP of VBG will be removed and if outbound connectivity is needed, then use a NAT gateway to enable it, but this is out of scope for the current post.

To summarize, instead of allowing anyone behind an IP address to connect to our VBG portal, we restrict this connectivity to specific IAM users. Additionally we keep VBG on a private network.

Guide

Start by preparing the project: enable Cloud Identity-Aware Proxy API. In the console 

  • APIs & Services > Enable APIs and Services 
  • search for Cloud Identity-Aware Proxy API  and press enable.
Once enabled you will see it displayed in the list APIs


Allow IAP to connect to your VM by creating a firewall rule. In console go to VPC network > Firewall and press Create Firewall Rule
  • name: allow-ingress-from-iap
  • targets: Specifed target tags and select the tag of your VBG instance. We are using "vbg-europe" network tag. If you don't use network tags you can select "All instances in the network"
  • source IPv4 ranges: Add the range 35.235.240.0/20 which contains all IP addresses that IAP uses for TCP forwarding.
  • protocols and ports - specify the port you want to access - TCP 443
  • press Save


Grant to users (or groups) permissions to use IAP TCP forwarding and specify to which instance to make it as restrictive as possible. Grant the roles/iap.tunnelResourceAccessor role to VBG instance by opening IAP admin page in console (Security > Identity-Aware Proxy). Go to SSH and TCP Resources page (you may ignore the OAuth warning).


Select your VBG instance and press Add principal. Give to the IAM principal IAP-Secured Tunnel User role. You may want to restrict access to VBG to specific periods of time or days of the week. In this case add an IAM time based condition as seen in the example below.

Save the configuration and now you are ready to connect to your isolated VBG instance. On the machine where you want to initialize the connection you would need to have gcloud cli installed (Cloud SDK). Run the following command to open a TCP forwarding tunnel to VBG instance on port 443.

gcloud compute start-iap-tunnel  your-vbg-instance-name 443 --local-host-port=localhost:0  --zone=your-instance-zone

When the tunnel is established you will see a message in the console with the local TCP port that is used for forwarding, similar to below image:

To be able to execute gcloud compute start-iap-tunnel you need to have compute.instances.get and compute.instances.list permissions on the project where VBG instance runs. You may grant the permissions to the users or groups using a custom role.

In case the user is not authorized in IAP or an IAM condition applied, then you will get the following message when trying to start the tunnel:


Finally it's time to open your browser, point it to the localhost and TCP port returned by gcloud command and connect to your VBG instance in the cloud: 

The proposed solution is suitable for management and operations of VBG. However, please keep in mind that IAP TCP forwarding is not intended for bulk data data transfer. Also, IAP automatically disconnects sessions after one hour of inactivity. 

In this post we've seen how to use Cloud IAP and Cloud IAM to enable secure access to Veeam Backup for Google Cloud console using zero trust architecture principals.

Wednesday, May 3, 2023

Veeam Cloud Integrated Agent

Veeam Backup and Replication v12 brings a cloud integrated agent as part of its optimizations for hybrid cloud architectures. The agent enables application aware immutable backups for cloud workloads hosted in AWS and Microsoft Azure. It is deployed and managed through native cloud API without direct network connection to the protected workloads and it stores the backups directly on object storage. 

Having the agent deployed inside the protected cloud workloads, Veeam enables the same application aware backup technology that it uses for on-premises workloads. This in turn unlocks granular recovery using Veeam Explorers.

Let's see the agent at work. We have an Ubuntu VM in Azure. The VM has only private connectivity (no public IP). There is also a PostgreSQL instance running on the VM that we want to protect it using application aware processing. 


Veeam Cloud Message Service installed on the backup server communicates with Veeam Cloud Message Service installed on the protected cloud machines via a message queue. The message service on the cloud machines will in turn communicate with other local Veeam components - Transport Service, Veeam Agent. The backups are sent directly to a compatible object storage repository. 

To start configuration, we need to create a protection group. In VBR console, from  Inventory > Physical Infrastructure > Create Protection Group


Select "Cloud machines"

Add Azure credentials, subscription and region

Select the workloads to protect - statically choosing the VMs or dynamically using tags


Select to exclude objects (if required)

Select Protection group settings - similar to the ones for a standard agent 


Finalize the protection group. 

Once the protection group is created, discovery of protected workloads starts. During the process Veeam components are pushed on the protected machine. Keep in there is no direct connectivity between Veeam Backup server (VBR) and the cloud machine. More, the cloud machine has only private IP address. All actions are done using Azure APIs and Azure native services.


First Veeam installs Veeam Cloud Message service on the protected instance. Then it installs Veeam Transport Service and Veeam Agent for for Linux. VBR server uses Cloud Message service and Azure Queue Storage to communicate with service on the protected instance. 

The cloud machine is configured. It's time to create a backup job. Go to Home > Jobs > Backup > Linux computer

We need to use managed by backup server. 


Select the protection group

Select the backup mode

Destination repository needs to be object storage

We'll enable application aware processing to protect the PostgreSQL instance running on the cloud machine. All the options for a standard Veeam Agent for Linux are available. We could run application aware backups for Oracle, MySQL, pre and post job scripts, pre and post snapshot scripts. We could also enable guest file system indexing.

The PostgreSQL instance has been configured to allow users with authentication. Add the user credentials to the agent.


Select the backup schedule and run the job


After the backup is completed we look at restore options. We can now restore our cloud machine on premises using Instant recovery. We can also restore it to another cloud. 

We have access to Veeam Explorer for PostgreSQL and we can restore the instance to another server, we can publish the instance to another server or restore the latest state to the protected VM. 


To implement 3-2-1 we can create a backup copy job and get a copy of the backups to another repository on premises or in another cloud service provider. 

In this post we have looked at the new Veeam cloud integrated agents, what are their advantages and we have learned how easy it is to configure them. 

Sunday, April 23, 2023

A Quick Look At Terraform Provider for Ansible

Terraform Provider for Ansible v1.0.0 has been release recently and while reading a couple of articles about it I actually wanted to see how it work end to end. 

We're going to look in this article at an use case where we provision cloud infrastructure with Terraform and then use Ansible to configure that infrastructure.

To be more specific, in our scenario we are looking at achieving the following

1. use Terraform to deploy an infrastructure in Google Cloud: VPC, VM instance with an external IP address and firewall rule to allow access to the instance 

2. automatically and transparently update Ansible inventory file 

3. automatically configure the newly provisioned VM instance with Ansible  


We use Terraform provider for Ansible and Ansible Terraform collection. From the collection we will be using the inventory plugin. Everything is run from a management machine installed with Terraform, Ansible and the Ansible collection (for installation please see the GitHub project linked above).

We will orchestrate everything from Terraform. We'll use Ansible provider to place the newly created VM instance to a specific Ansible group called "nginx_hosts" and execute Ansible commands to update the inventory and run the playbook that installs nginx. 

For simplicity we use a flat structure with a single Terraform configuration file, an Ansible inventory file and an Ansible playbook. 


We start by looking at the Ansible files.

inventory.yml contains only one line that references the collection inventory plugin:

plugin: cloud.terraform.terraform_provider

This way we make sure the inventory file is actually created dynamically based on the Terraform state file. 

nginx_install.yml is the playbook that installs nginx on the VM instance. It's a very simple playbook that checks the latest version is installed and that it is started. We will be using Ubuntu for our Linux distribution. 

---
- hosts: nginx_hosts
  tasks:
    - name: ensure nginx is at the latest version
      apt: name=nginx state=latest update_cache=true
      become: true
    - name: start nginx
      service:
          name: nginx
          state: started

Based on the code written so far, if we add any host to the group named "nginx_hosts" running the playbook will ensure latest version of nginx is installed. We have no knowledge of IP addresses or the hostnames of those hosts. We actually have no idea if there are any hosts in the group. 


The Ansible hosts that we want to configure are created using Terraform. For simplicity there is only one flat file - main.tf file. We start by defining the Ansible provider.

terraform {
  required_providers {
    ansible = {
      source  = "ansible/ansible"
      version = "1.0.0"
    }
  }
}

Next we define the variables. We are using Google Cloud provider and we need some variables to configure it and deploy the resources. We are using a user_id to generate unique resource name for each deployment. We add GCP provider variables (region, AZ, project) and variables for the network.

variable "user_id" {
  type = string
  description = "unique id used to create resources"  
  default = "tfansible001"
}

variable "gcp_region" {
  type = string
  description = "Google Cloud region where to deploy the resources"  
  default = "europe-west4"
}

variable "gcp_zone" {
  type = string
  description = "Google Cloud availability zone where to deploy resources"  
  default = "europe-west4-a"
}

variable "gcp_project" {
  type = string
  description = "Google Cloud project name where to deploy resources" 
  default = "your-project"
}

variable "networks" {
  description = "list of VPC names and subnets"
  type        = map(any)
  default = {
    web = "192.168.0.1/24"
  }
}

variable "fwl_allowed_tcp_ports" {
  type        = map(any)
  description = "list of firewall ports to open for each VPC"
  default = {
    web = ["22", "80", "443"]
  }
}

We need also variables for Ansible provider resources: ansible user that can connect and configure the instance, the path the the ssh key file and the path to python executable. In case you use just want to test this, you can use your Google Cloud user. 

variable "ansible_user" {
  type = string
  description = "Ansible user used to connect to the instance"
  default = "ansible_user"
}

variable "ansible_ssh_key" {
  type = string
  description = "ssh key file to use for ansible_user"
  default = "path_to_ssh_key_for_ansible_user"
}

variable "ansible_python" {
  type = string
  description = "path to python executable"
  default = "/usr/bin/python3"
}

Then we configure the Google Cloud provider. Note that in Terraform it is not mandatory to define a provider with requried_provider block. Also note that for Ansible provider there is no configuration. 

provider "google" {
  region  = var.gcp_region
  zone    = var.gcp_zone
  project = var.gcp_project
}


Time to create the resources. We start with the VPC, subnet and firewall rules. The code iterates through the map object defined in variables section:

resource "google_compute_network" "main" {
  for_each                = var.networks
  name                    = "vpc-${each.key}-${var.user_id}"
  auto_create_subnetworks = "false"
}

resource "google_compute_subnetwork" "main" {
  for_each                 = var.networks
  name                     = "subnet-${each.key}-${var.user_id}"
  ip_cidr_range            = each.value
  network                  = google_compute_network.main[each.key].id
  private_ip_google_access = "true"
}

resource "google_compute_firewall" "allow" {
  for_each = var.fwl_allowed_tcp_ports
  name     = "allow-${each.key}"
  network  = google_compute_network.main[each.key].name

  allow {
    protocol = "tcp"
    ports    = each.value
  }

  source_ranges = ["0.0.0.0/0"]

  depends_on = [
    google_compute_network.main
  ]
}

Then we deploy the VM instance and we inject the ssh key using VM metadata. Again, ansible_user could be your Google user if you are using this for a quick test.

resource "google_compute_instance" "web" {
  name         = "web-vm-${var.user_id}"
  machine_type = "e2-medium"

  boot_disk {
    initialize_params {
      image = "projects/ubuntu-os-cloud/global/images/ubuntu-2210-kinetic-amd64-v20230125"
    }
  }

  network_interface {
    network    = google_compute_network.main["web"].self_link
    subnetwork = google_compute_subnetwork.main["web"].self_link
    access_config {}
  }

  metadata = {
    "ssh-keys" = <<EOT
      ansible_user:ssh-rsa AAAAB3NzaC1y...
     EOT
  }

}


So far we have the infrastructure deployed. We now need to configure the VM instance. We will configure a resource of type ansible_host. The resource will be used to dynamically update the Ansible inventory. 

resource "time_sleep" "wait_20_seconds" {
  depends_on      = [google_compute_instance.web]
  create_duration = "20s"
}

resource "ansible_host" "gcp_instance" {
  name   = google_compute_instance.web.network_interface.0.access_config.0.nat_ip
  groups = ["nginx_hosts"]
  variables = {
    ansible_user                 = "${var.ansible_user}",
    ansible_ssh_private_key_file = "${var.ansible_ssh_key}",
    ansible_python_interpreter   = "${var.ansible_python}"
  }

  depends_on = [time_sleep.wait_20_seconds]
}

We've added a sleep time to make sure the VM instance is powered on and services are running. Please note that we add the public IP of the VM instance, whatever that is, as the host name in Ansible. The host is added to "nginx_hosts" group. We also let Ansible know what user, ssh key and python version to use. 

Last thing to do is to update Ansible inventory and run the playbook. We will use terraform_data resources to execute Ansible command line.

resource "terraform_data" "ansible_inventory" {
  provisioner "local-exec" {
    command = "ansible-inventory -i inventory.yml --graph --vars"
  }
  depends_on = [ansible_host.gcp_instance]
}

resource "terraform_data" "ansible_playbook" {
  provisioner "local-exec" {
    command = "ansible-playbook -i inventory.yml nginx_install.yml"
  }
  depends_on = [terraform_data.ansible_inventory]
}

And that's it. Once you update the code above with your information and run terraform apply, it will automatically deploy a Google Cloud VM instance and configure it with Ansible. All transparent and dynamic, all driven from Terraform. 

In this article you've seen how to use Terraform to deploy a cloud VM instance and automatically and transparently configure it with Ansible.

Monday, April 17, 2023

Moving Backups to Hardened Linux Repositories

It's not enough to have a backup of your data. You need to make sure that you will be able to recover from that backup when the time comes. And one of the best ways to make sure you can do it, is to make protect your backups from being modified intentionally or unintentionally. 

In Veeam Backup & Replication, a hardened repository is using a Linux server to provide immutability for your backups. The feature was first released in version 11. Let's see what makes the hardened repository special, how it protects your backups from changes and how easy is to actually start using it 


Immutable file attribute

Linux file system allows setting special attributes to its files. One of these attributes is immutable attribute. As long as it is set on a file, that file cannot be modified by any user, not even root. More, root user is the only user that can actually set and unset the immutable attribute on a specific file. You can do it using lsattr and chattr commands in Linux as seen in the below screenshot:

Veeam hardened repo uses exactly the same mechanism of making backup files immutable.  


Isolate Linux processes 

To run a successful repository, Veeam needs several functionalities: to receive data from proxies, to open and close firewall ports, to set and unset immutability as per retention policy. In order to harden the repository, Veeam implements these functionalities as separate Linux processes.

The processes that sets and unsets immutable attribute on the backup files is called veeamimmureposvc and it needs to run with root privileges, as root user is the only user that can modify immutable attribute.

veeamtransport --run-service is the Data Mover service performing data receiving, processing and storing.  Because it is a service exposed on the network, it is running under a standard Linux user. In case of a  breach, the service will give access only to a standard user with limited privileges. The Linux user under which this service runs must not be allowed to elevate its privileges. 

A third process takes care of dynamically opening and closing  firewall ports: veeamtransport --run-environmentsvc and this one is also running with elevated privileges. 

The following screen shot shows the three main services that are part of a hardened repository. 


Single use credentials

Another layer of protection is added through the way the credentials are handled within the backup server.

To add the Linux repo to the backup server you need to specify Linux credentials. These credentials are only used during the initial configuration process and they are never stored in backup server's credential manager. Temporary privilege elevation may be needed during the repository configuration  for deployment and installation of Veeam processes. After the configuration process finishes, all elevated privileges must be revoked from the user. 


Additional repository features - fast clone

This one is not a security related feature, but it comes in as a great add on to the hardened repository.

In case you formatted your file system with XFS file system and you have a supported Linux distribution (see this user guide page for more details), Veeam will use fast clone to reduce used disk space on the repository and increase the speed of synthetic backups and transformations. Fast clone works by referencing existing data blocks on the repository instead of copying the data blocks between files. 


Using the hardened repository

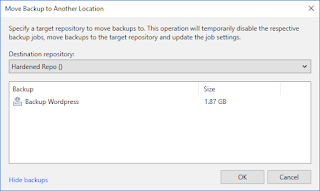
For new backup jobs, just point them to your hardened repository. In case you have existing backups then you need to migrate those to your new repo. With v12 comes a new feature that allows to move any backup from an existing repository to another one. Simply select your backup, right click it and you will see that now you can "move backup"


Let's look at moving backups from a Windows NTFS repository to our hardened Linux repo. We start with an empty repository configured with a service account called veeambackup


The first backup chain is for an unencrypted backup job. The backup job is configured to use a standard Windows repository. There are 2 full restore points in the backup chain. Each restore point is 960 MB and the total size on disk is 1.87 GB. We use "move backup" to send the the backup chain to the hardened repository:


Once the move processes finished, the backup job has been updated to point to the new repository. Let's check what happened on the Linux hardened repo. 

Find the backup chain in our repo:


Check the immutability flag:


The restore points are set as immutable. The metadata file is not since this file is modified during each backup operation. Trying to delete any of the restore points will fail:
 

We can also check that XFS fast clone is working by looking at the used space on the repo which is less that the sum of the 2 full backups:


In this post we've looked at the features of hardened repository and how they work. To implement a hardened repository in your environment follow the steps in the user guide  

Saturday, March 11, 2023

Clear DNS Cache on VCSA after ESXi IP Address Update

I've recently had to do some changes and modify the ESXi management IP address. Once the ESXi host has been put to maintenance mode and removed from vCenter Server inventory I've updated the DNS server records: A and PTR records. Checking DNS resolution works, I've tried to re-add servers to vCenter Server using their FQDN, but it errored with no route to host. This is because of the DNS client cache on VCSA. 

To solve it fast and not wait too long you need to ssh to VCSA appliance and run the following commands: 

systemctl restart dnsmasq

systemctl restart systemd-resolved

Once the services are restarted you can add again the ESXi hosts using the FQDN.

Wednesday, February 22, 2023

A Look at Veeam Backup & Replication v12 NAS Backup - Creating file share backup job

In the previous post "A Look at Veeam Backup & Replication v12 NAS Backup - Initial Configuration" we discussed about NAS backup architecture and the initial configuration needed to setup infrastructure. It is time to continue with the creation of the backup  job and its options


Give the backup job a name

Select the shares to protect

If  you want to exclude files from being backed up, go to Advanced

Select the repository (we use here S3 compatible on premises minio)

Advanced settings for the backup job will let you specify how many versions to protect

Specify how to process ACLs for files and folders

Define compression and encryption 

If you want to plan periodic backup file maintenance, you can do it here

You can run scripts pre and post job execution, for example if you want to create a snapshot of the file share before the job runs

In case you would like to get warnings in the job about skipped files, configure here

Because we use S3 compatible, we are asked about helper appliance. We will skip it.

On archival page we selected another S3 compatible storage, this time in AWS. We will AWS S3 bucket to hold a copy of the primary storage and also to move there any files older than 3 months

Here you can filter out files that are sent to acrhive

Finally, schedule the backup job

And run it